How to use Node-RED for IoT in Manufacturing - Part 3
Welcome back to our blog post series on how to use Node-RED for IoT in manufacturing. In the last two parts, we learned what Node-RED is and how to set it up on a Raspberry Pi. In this part, we will have some fun and create a simple IoT application with Node-RED.
What are we going to build?
Our goal is to build an IoT application that can monitor the temperature and humidity of a factory using a DHT11 sensor connected to a Raspberry Pi. We want our application to do the following things:
- Send the sensor data to an MQTT broker every 10 seconds using a topic name of “factory/sensor”.
- Show the sensor data on a dashboard with a gauge and a chart.
- Send an email alert if the temperature or humidity goes above or below certain limits.
Sounds cool, right? Let’s get started!
How are we going to build it?
To build our IoT application with Node-RED, we need to use some nodes that can handle the data sources, data processing, and data destinations. We also need to connect them with wires to define the data flow between them. We can configure each node with some properties that tell them what to do and how to do it.
In this blog post, we will use the following nodes:
- Inject node: This node will trigger the data collection from the sensor every 10 seconds.
- Rpi-dht22 node: This node will read the temperature and humidity values from the DHT11 sensor connected to GPIO4 of the Raspberry Pi.
- Mqtt out node: This node will publish the sensor data to an MQTT broker using a topic name of “factory/sensor”.
- Dashboard nodes: These nodes will display the sensor data on a dashboard with a gauge and a chart.
- Switch node: This node will check if the temperature or humidity is above or below certain limits.
- Email node: This node will send an email alert if the temperature or humidity is out of range.
Here are the steps to build our IoT application with Node-RED:
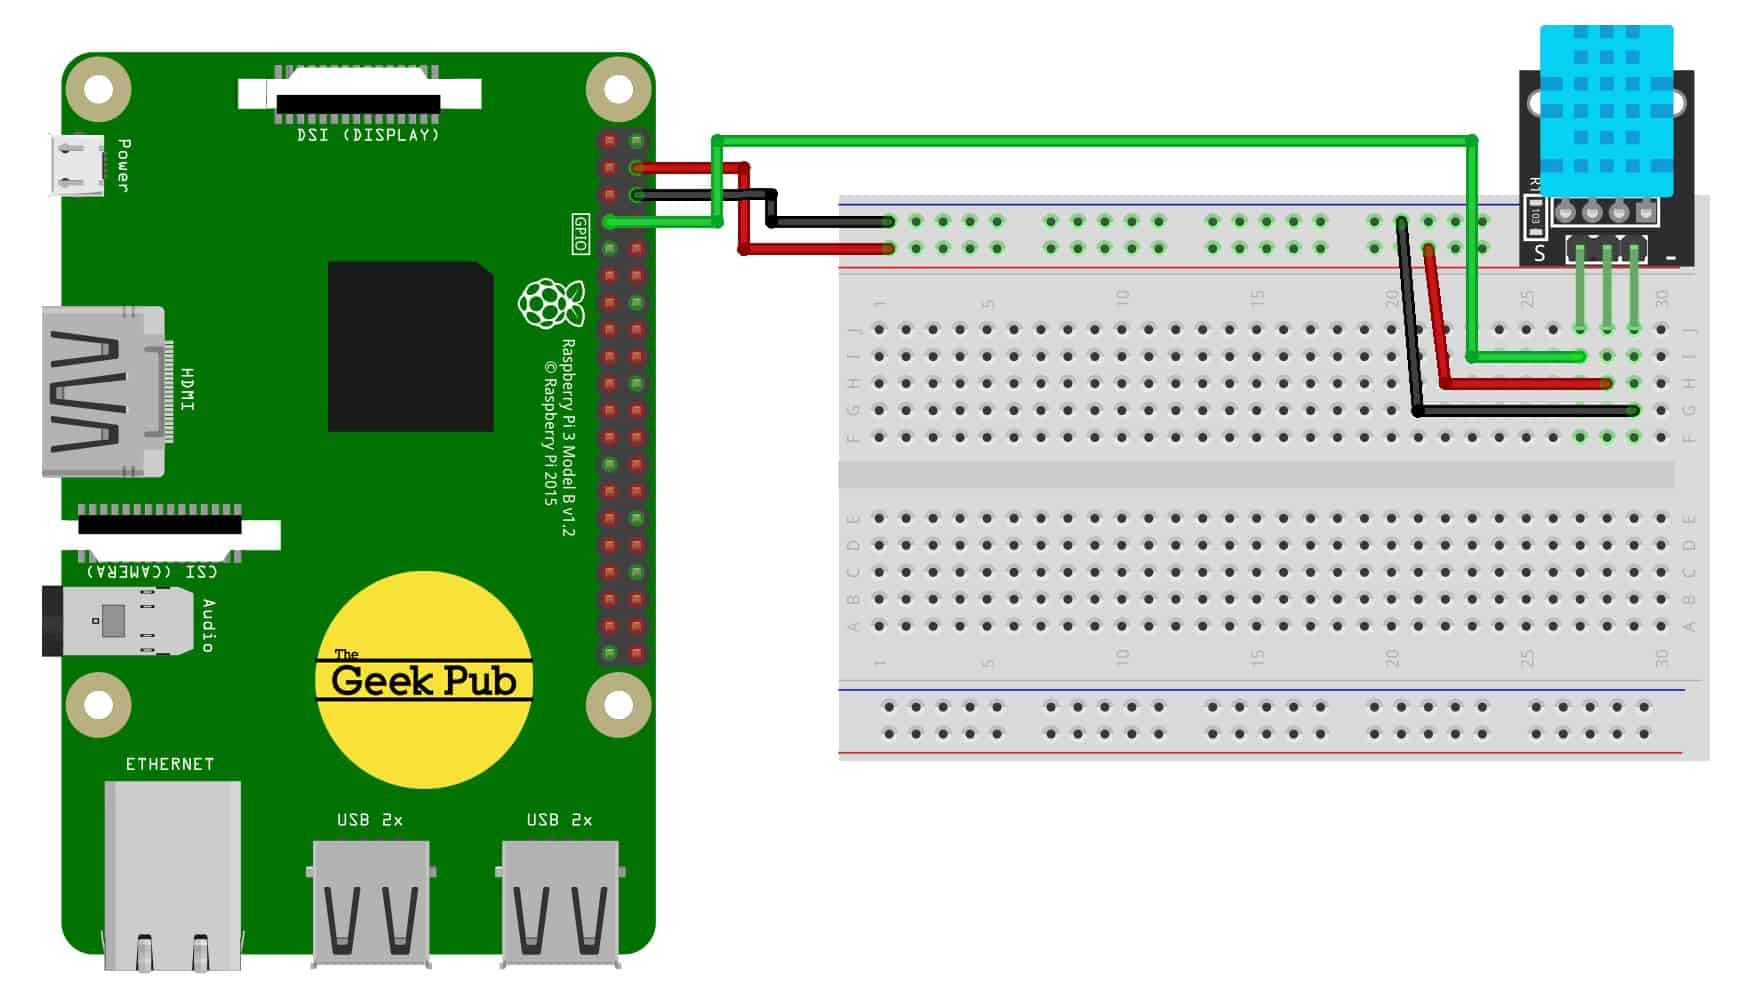
- Connect the DHT11 sensor to the Raspberry Pi using jumper wires. The DHT11 sensor has four pins: VCC (power), GND (ground), DATA (data), and NC (not connected). Connect the VCC pin to pin 1 (3.3V) of the Raspberry Pi, the GND pin to pin 6 (GND) of the Raspberry Pi, and the DATA pin to pin 7 (GPIO4) of the Raspberry Pi.
- Open the Node-RED web portal on your browser by entering http://raspberrypi:1880
-
Drag and drop an inject node from the palette to the workspace. This node will trigger the data collection from the sensor every 10 seconds. Double-click on the node to open its properties. Change its name to “Every 10 seconds”, change its payload type to “timestamp”, and change its repeat interval to “10 seconds”.
-
Drag and drop a rpi-dht22 node from the palette to the workspace. This node will read the temperature and humidity values from the DHT11 sensor connected to GPIO4 of the Raspberry Pi. Double-click on the node to open its properties. Change its name to “DHT11”, change its sensor type to “DHT11”, and change its pin number to “4”.
-
Drag and drop an mqtt out node from the palette to the workspace. This node will publish the sensor data to an MQTT broker using a topic name of “factory/sensor”. Double-click on the node to open its properties. Change its name to “MQTT”, change its topic name to “factory/sensor”, and click on the pencil icon next to server field to add a new MQTT broker configuration.
-
In the MQTT broker configuration window, enter the details of your MQTT broker, such as host name, port number, user name, password, etc. You can use any public or private MQTT broker service, such as Mosquitto, HiveMQ, CloudMQTT, etc. For this example, we will use test.mosquitto.org as our MQTT broker host name.
-
Click on Add and then Done to save the MQTT broker configuration and close the window.
-
Wire the inject node to the DHT11 node and the DHT11 node to the MQTT node. This will create a data flow from the sensor to the MQTT broker.
-
Drag and drop a gauge node and a chart node from the dashboard palette to the workspace. These nodes will display the temperature and humidity values on a dashboard. Double-click on the gauge node to open its properties. Change its name to “Temperature”, change its label to “Temp (°C)”, change its unit to “°C”, and change its range to “0” and “50”. Double-click on the chart node to open its properties. Change its name to “Humidity”, change its label to “Hum (%)”, change its unit to “%”, and change its y-axis min and max to “0” and “100”.
-
Wire the DHT11 node to both the gauge node and the chart node. This will create a data flow from the sensor to the dashboard.
-
Drag and drop a switch node and an email node from the palette to the workspace. These nodes will send an email alert if the temperature or humidity is out of range. Double-click on the switch node to open its properties. Change its name to “Alert”, change its property to “msg.payload.temperature”, add two rules: one for “< 10” and one for “> 40”, and check the box for “Otherwise”. Double-click on the email node to open its properties. Change its name to “Email”, enter your email address in the “To” field, enter your email service provider details in the server field, and enter your email subject and message in the template field.
-
Wire the DHT11 node to the switch node and the switch node to the email node. This will create a data flow from the sensor to the email service.
-
Click on Deploy button at the top right corner of the screen to deploy your IoT application.
-
Open a new browser tab and enter http://raspberrypi:1880/ui to access your dashboard. You should see your temperature and humidity values displayed on a gauge and a chart.
- If your temperature or humidity values go above or below certain limits, you should receive an email alert in your inbox.
Congratulations! You have successfully created a simple IoT application with Node-RED that monitors the temperature and humidity of a factory using a DHT11 sensor connected to a Raspberry Pi.
You can experiment with different nodes, settings, and data sources to create more complex and useful IoT applications with Node-RED.
We hope you enjoyed this blog post series on how to use Node-RED for IoT in manufacturing. If you have any questions or feedback, please leave them in the comments below.
Happy coding!